Building the USS Enterprise aircraft carrier CVN-65
I had wanted to build a large ship for quite some time, and there is no better ship to honour with a large Lego build than the Enterprise. As the United States first Nuclear powered aircraft carrier, she packed 8 reactors and at over 1000ft long, was and still is the longest military ship in the world. Although made inactive in 2012, she is still floating, although in an unusable state.When starting to plan the design by looking at 100's of images on the internet, I came across a user on Mocpages who had built it in LDD and so I decided to reverse engineer it from the images he uploaded.
Total build time window was 3 weeks with about 50 hours going into the actual build itself.
Sitting on a configuration of two wide and nine long of the 32x32 baseplates in blue, I built the ship to separate into 3 sections for transportation so that each section is on a more manageable two wide 3 long baseplate section.
Laying down the base: (with my trusty assistant)
After building up a base with cross sections to give it rigidity, I then started work on the rear of the carrier next so that I could wait whilst a few orders of slopes required for the front of the ship arrived from Bricklink.
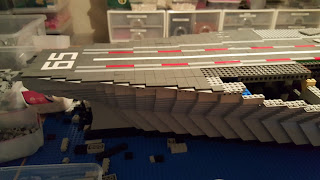
I used a lot of arches to give the ship it's core strength require for supporting the flight deck and also in making sure it doesn't fall apart when being transported. One of the key differences between models built for home display, and those built for shows are the level of engineering that has to go into the structural design.
The back section was probably the easiest due to the fact that it is straight up and down, even though it has a bit more detail and greebling done to it than the rest of the ship. The ship starts widening and elevators are marked out on the flight deck. I couldn't easily make the internal hangar, so I chose to install doors and non moving hangars. I may come back and retrofit motorised hangars at a later point in time.
Work continues on the midsection below with the base of the island being installed and more of the curved sections of the hull.
More interior shots with structure using arches.
The work on the bow was some of the most difficult, and required lots of rebuilding to get the angles and dimensions correct. I eventually made the front 2 studs thinner to give it a more accurate look.
Some overall progress shots with more tiling done on the flight deck.
More pics of the redesigned bow, I finally got it right, but it took a lot of trial and error..
Finishing off the final part of the bow, and tiling of the deck. It is hard to get the lines on the deck to not look blocky at this scale.
At the 99% completed stage, just need to add some string across the deck to act as arrestors, build some jets for the deck, and add some waves around the sides of the ship.


